Exploring the World of Home Canning and Jarring Techniques
In recent years, there has been a resurgence of interest in home canning and jarring techniques. This age-old method of preserving food has been rediscovered by many individuals and families as a way to save money, reduce food waste, and enjoy the satisfaction of creating homemade jams, pickles, and other preserved goods. Whether you are new to the world of home canning and jarring or a seasoned expert, this article will explore various techniques, tips, and tricks to help you on your journey of preserving food at home.
Benefits of Home Canning and Jarring
There are many reasons to start home canning and jarring, and the benefits go beyond just having tasty and healthy foods to enjoy. Here are a few reasons why you should consider adding this practice to your household:
Reduced Food Waste
In today’s world, food waste is a significant global issue. According to the Food and Agriculture Organization (FAO) of the United Nations, approximately one-third of all food produced in the world is lost or wasted. By canning and jarring fruits and vegetables from your garden or local farmers’ market, you can enjoy fresh produce all year round and reduce your contribution to food waste.
Cost Savings
Purchasing produce in bulk when it is in season and preserving it through canning and jarring is a great way to save money. Not only can you get fruits and vegetables at a lower cost, but you can also avoid paying premium prices for out-of-season produce. Plus, homemade preserves make great gifts for friends and family, saving you money on holiday and birthday gifts.
Customization
When canning and jarring at home, you have complete control over the ingredients and flavors of your preserved goods. You can customize recipes to your preference and dietary restrictions, making them healthier and more suitable for your taste buds. Additionally, homemade preserves allow you to experiment with different flavor combinations, creating unique and delicious products that cannot be found in stores.
Essential Equipment for Home Canning and Jarring
Before you start the canning process, it is essential to have the right equipment on hand. Here are some must-haves for home canning and jarring:
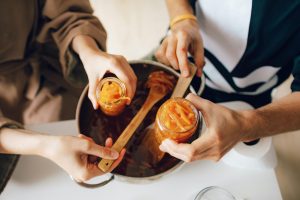
Canning and Jarring Jars
Jars specifically designed for canning and jarring are crucial to the success of your preserves. These airtight jars come in various sizes and shapes and can be reused for multiple canning batches. It is essential to use jars made explicitly for canning and jarring to ensure the safety and quality of your preserves.
Boiling Water Canner
A boiling water canner is a large pot with a lid that is used to process canned goods. It is typically made of aluminum, stainless steel, or enamel. A canner must be large enough to cover the jars with one to two inches of boiling water and have a rack at the bottom to allow for proper water circulation during the canning process.
Canning Tools
Investing in a few essential canning tools, such as a jar lifter, funnel, and magnetic lid lifter, can make the canning process more efficient and safe. These tools help handle hot jars and lids safely and prevent burns.
Labels and Sharpie
It is essential to label your canned goods with the name, date, and any other relevant information, such as batch number or ingredients. This will help you keep track of what is in your pantry and when it was canned. A sharpie or other permanent marker works best for writing on labels.
Basic Steps for Home Canning and Jarring
The canning and jarring process may seem intimidating at first, but with the right equipment and proper steps, it can be a straightforward and enjoyable experience. Here are the basic steps for home canning and jarring:
Clean and Sterilize Jars and Lids
Before starting the canning process, ensure that your jars, lids, and canning tools are clean and sterilized. You can either use the dishwasher with a hot water cycle or boil them in a large pot of water for 10 minutes to sterilize them.
Prepare Ingredients
Prepare the fruits or vegetables according to your chosen recipe. The fruits or vegetables must be fresh and at their peak ripeness for the best results. Wash them thoroughly and remove any stems, pits, or seeds.
Fill Jars and Wipe Rims
Fill the sterilized jars with the prepared ingredients, leaving about half an inch of headspace at the top. Using a damp cloth, wipe the rims of the jars to remove any food particles or residue.
Secure Lids and Process Cans in Boiling Water Canner
Place the lids on the jars, ensuring they are tightly closed, and place them in the boiling water canner. Bring the canner to a rolling boil and process the jars for the recommended time according to the recipe.
Remove Jars and Let Cool
After the processing time is up, use the jar lifter to remove the cans from the canner and place them on a cooling rack. Let the jars cool for 12 to 24 hours, and you will hear a “pop” sound when the jars seal correctly.
Label and Store Jars
Once cooled, label the jars and store them in a cool, dark place. Properly sealed jars can last for up to a year, and it is essential to check the seals before consuming the preserves.
Conclusion
Home canning and jarring is a satisfying and practical way to preserve the flavor of seasonal produce and reduce food waste. With the right equipment and proper steps, you can create delicious homemade jams, pickles, and other preserved goods that can be enjoyed all year round. So, get your jars and ingredients ready and start exploring the world of home canning and jarring today!